Easy Angel Crafts: Angel Gift Bag
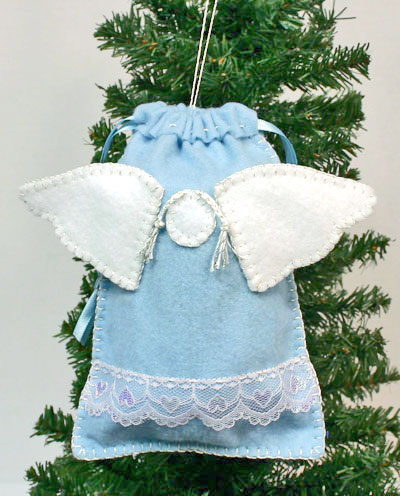
This easy angel crafts angel gift bag easily holds a keepsake gift anytime of the year and can also hang as an ornament on a tree at Christmas.
With a few inexpensive materials and easy sewing techniques, this easy angel crafts -angel gift bag becomes a pretty package and a keepsake for future enjoyment.
With a few inexpensive materials and easy sewing techniques, this easy angel crafts -angel gift bag becomes a pretty package and a keepsake for future enjoyment.

Let's look at the materials and the steps for how to make the angel gift bag:
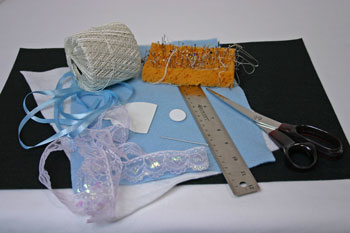
Easy Angel Crafts: Angel Gift Bag Materials and Tools:
Craft felt - 9 inches x 12 inches, one pale blue and one white
Silver yarn
Narrow ribbon 1/4 to 1/8 inch wide by three feet long
Lace just over six inches long by 1 to 1 1/2 inches wide Yarn darner needle
Straight pins
Safety pin
Ruler
Scissors
Angel pattern for wing and face shapes (click here for the Easy Angel Crafts Angel Gift Bag pattern)
Silver yarn
Narrow ribbon 1/4 to 1/8 inch wide by three feet long
Lace just over six inches long by 1 to 1 1/2 inches wide Yarn darner needle
Straight pins
Safety pin
Ruler
Scissors
Angel pattern for wing and face shapes (click here for the Easy Angel Crafts Angel Gift Bag pattern)
The Steps for How to Make the Easy Angel Crafts: Angel Gift Bag
:
Print the Easy Angel Crafts angel patterns page.
(The page also includes patterns for the Easy Angel Crafts - Quilter's Angel and the Easy Angel Crafts - Angel Trio.)
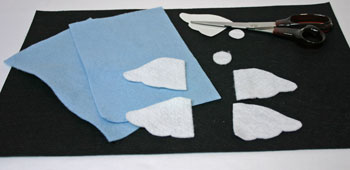
Cut out the wing and face shapes specified for the Angel Gift Bag.
(The page also includes patterns for the Easy Angel Crafts - Quilter's Angel and the Easy Angel Crafts - Angel Trio.)
Cut out the wing and face shapes specified for the Angel Gift Bag.
Make sure the edges of the blue felt are straight.
Cut the piece of felt in half across the shorter side.
The craft pieces of felt can vary slightly in size.
For craft felt 9 inches x 12 inches, the resulting pieces should be 6 inches by 9 inches when cut in half.
Using the white felt, cut four of the wing shapes and one of the oval for the angel's face.
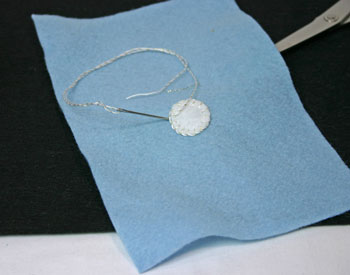
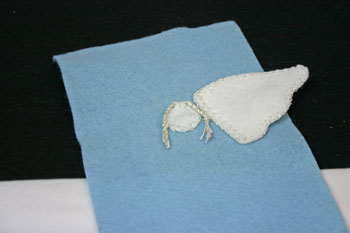
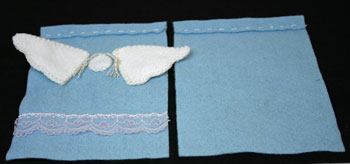
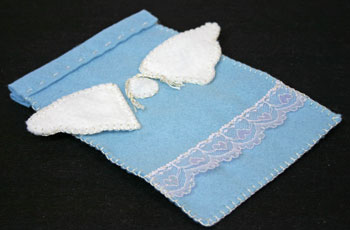
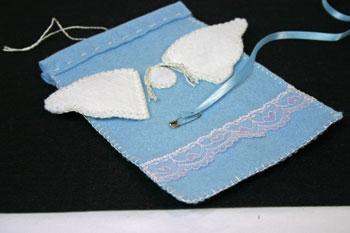
Position the white oval one third of the way down the length of one of the blue pieces.
Center the oval across the width.
Pin the oval in place.
Center the oval across the width.
Pin the oval in place.
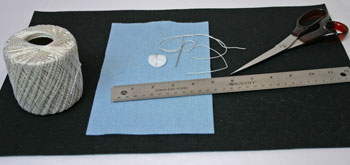
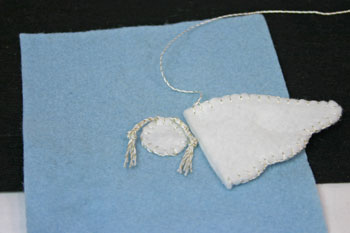
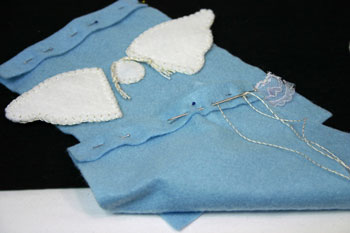
Thread the yarn darner needle with the silver yarn.
Place a knot in one end of the yarn and begin sewing the white felt oval to the blue felt.
Place a knot in one end of the yarn and begin sewing the white felt oval to the blue felt.

Use the blanket stitch to sew around the white felt oval for the angel's face and head.
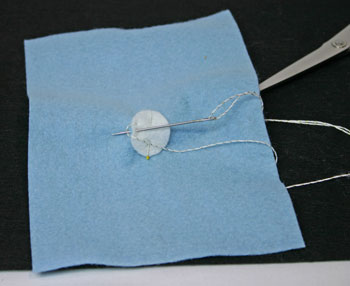
Finish the sewing by taking the thread to the back of the piece and hiding the final knot.
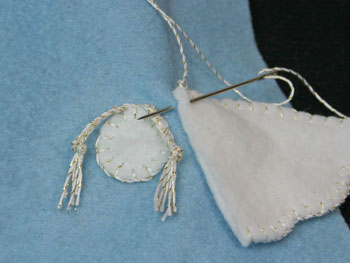
With more silver yarn in the needle, attach twelve pieces of yarn, six for each side, to the top of the oval.
Their length should be three to four inches.
Their length should be three to four inches.
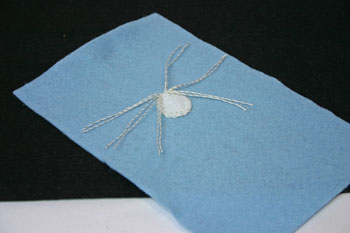
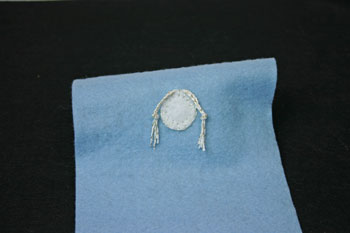
Braid the six strands on either side.
Use three sets of two strands each to form each braid.
Add a knot in at the end of each braid.
Trim the ends of the yarn if necessary.
Optionally, you can tack the braids to each side of the face of the angel on the Easy Angel Crafts Angel Gift Bag with a couple of stitches.
Use three sets of two strands each to form each braid.
Add a knot in at the end of each braid.
Trim the ends of the yarn if necessary.
Optionally, you can tack the braids to each side of the face of the angel on the Easy Angel Crafts Angel Gift Bag with a couple of stitches.
Each wing consists of two wing shapes sewn together.
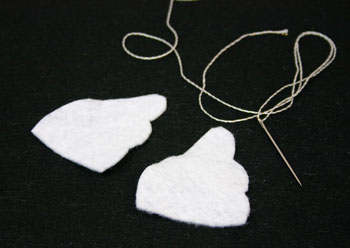
Match two of the shapes together.
Thread the yarn darner needle with silver yarn and add a knot to one end of the yarn.
Begin sewing by hiding the knot between the two pieces of felt.
Thread the yarn darner needle with silver yarn and add a knot to one end of the yarn.
Begin sewing by hiding the knot between the two pieces of felt.
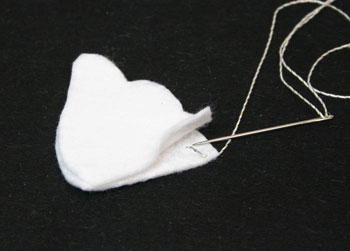
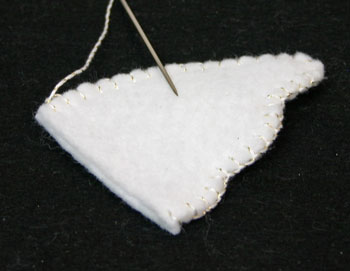
Use the blanket stitch to sew the wing pieces together on the curved edges.
Stop the stitches at the straight edge but leave the needle and yarn attached.
Stop the stitches at the straight edge but leave the needle and yarn attached.
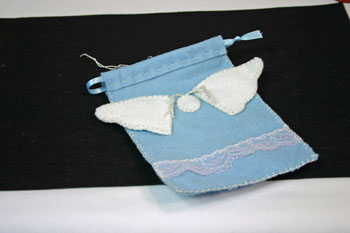
Position the wing at an angle to one side of the angel's face.
Sew the wing shape to the blue felt by continuing with the blanket stitches along the straight edge.
By just sewing the straight edge to the side of the Easy Angel Crafts Angel Gift Bag, the angel's wing "floats" over the blue felt.
Follow the steps above to sew around the curved edges of the second set of wings.
The blanket stitch should be the same on the front and the back, but you may want to stitch from the most visible side for consistency in the stitches.
After stitching around the curved edges, position the wing shape on the opposite side of the angel's face mirroring the position of the first wing shape.
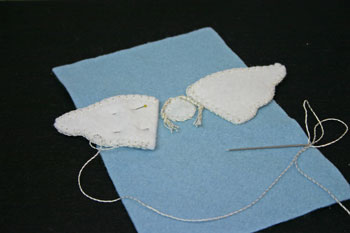
Finish attaching the second wing shape by blanket stitching to the blue felt along the straight edge.
When finished, take the yarn to the back and knot the thread.
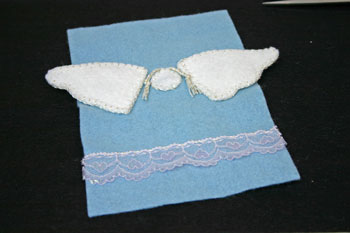
Place the top edge of the lace 2 to 2 1/2 inches from the bottom edge of the blue felt.
When finished, take the yarn to the back and knot the thread.
Place the top edge of the lace 2 to 2 1/2 inches from the bottom edge of the blue felt.

Pin the lace in place.
Thread the yarn darner needle with the silver yarn and knot one end of the yarn.
Use a simple running stitch to attach the top of the lace to the blue felt.
Thread the yarn darner needle with the silver yarn and knot one end of the yarn.
Use a simple running stitch to attach the top of the lace to the blue felt.
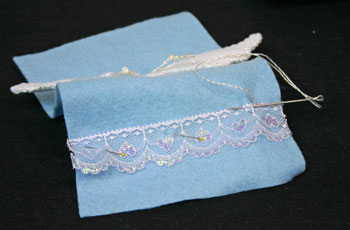
Trim the lace even with the edges of the blue felt.
Make a casing for the bag's ribbon ties by folding down 1/2 inch along the top edge of both pieces of the blue felt.
Pin in place.
Thread the yarn darner needle with silver yarn and knot one end.
Use a simple running stitch 1/8 inch from the edge of the folded casing.
Pin in place.
Thread the yarn darner needle with silver yarn and knot one end.
Use a simple running stitch 1/8 inch from the edge of the folded casing.
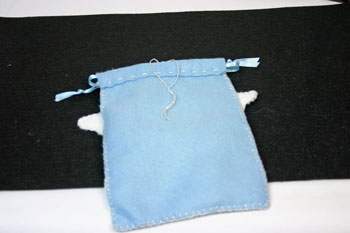
Sew casings in the top of both sides of the Easy Angel Crafts Angel Gift Bag.
Match the front and back of the bag with the wrong sides together.
Thread the yarn darner needle with the silver yarn and knot one end.
Using the blanket stitch, begin stitching the bag together.
Start just below the casing area.
Thread the yarn darner needle with the silver yarn and knot one end.
Using the blanket stitch, begin stitching the bag together.
Start just below the casing area.

The stitches flow down one side, along the bottom and up the second side.
Do not stitch the casing area together.
Do not stitch the casing area together.
Optional. Add a loop of yarn to the center top of the back casing.
This loop becomes a hanger for hanging the angel keepsake bag on the tree.
However, the ribbon ties could also be used as hanging loops.
This loop becomes a hanger for hanging the angel keepsake bag on the tree.
However, the ribbon ties could also be used as hanging loops.
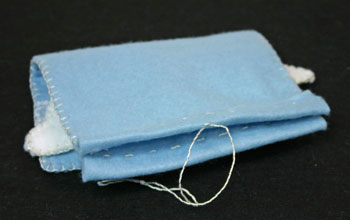
Place a safety pin in the end of the ribbon.
Using the safety pin, push the ribbon through the casing on one side of the bag and back through the casing of the second side.
Hold the ribbon ends with three inches protruding from the casing.
Trim the ribbon ends and tie in a simple knot.
Hold the ribbon ends with three inches protruding from the casing.
Trim the ribbon ends and tie in a simple knot.
With another piece of ribbon form another loop opposite the first being careful not to tangle the ribbons.
The ribbons form a drawstring.
When pulled on either side, the Easy Angel Crafts Angel Gift Bag forms into the angel's shape.
When pulled on either side, the Easy Angel Crafts Angel Gift Bag forms into the angel's shape.
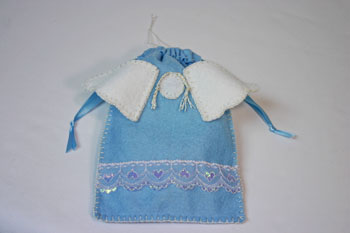
The Easy Angel Crafts Angel Gift Bag can hang on the tree or be a simple keepsake bag to hold a gift for a special someone.
This angel doesn't show facial features, but a few French knots, a couple of beads or paint pens could easily add facial details.
Have fun!
With simple and inexpensive materials and a few simple sewing techniques this Easy Angel Crafts Angel Gift Bag becomes a keepsake treasure.
Have fun!
With simple and inexpensive materials and a few simple sewing techniques this Easy Angel Crafts Angel Gift Bag becomes a keepsake treasure.


funEZcrafts
Welcome
Come on in and stay awhile...

funEZcrafts
Welcome
Come on in and stay awhile...