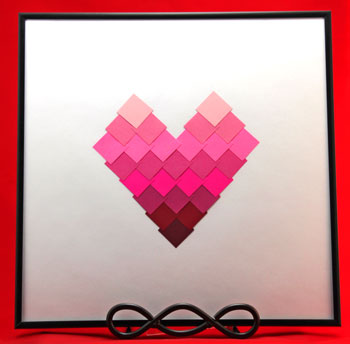
Easy Christmas Crafts: Ombre Squares Heart
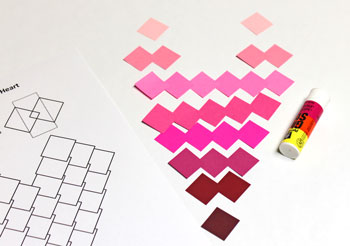
Use eight graduated colors of paper squares from dark red at the bottom point to pale pink at the top to make this Ombre Squares Heart.
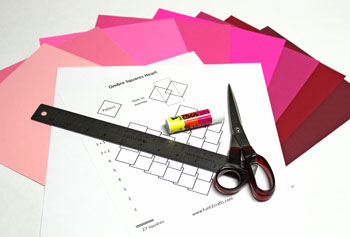
Easy Paper Crafts: Ombre Squares Heart Materials and Tools:
Paper - eight graduated colors - in red to pale pink or the color of your choice
One 12x12 background paper - matching or contrasting
Ruler
Glue
Scissors
Ombre Squares Heart pattern (click to open PDF for printing)
Frame - 12x12 scrapbook frame - optional (not shown below)
One 12x12 background paper - matching or contrasting
Ruler
Glue
Scissors
Ombre Squares Heart pattern (click to open PDF for printing)
Frame - 12x12 scrapbook frame - optional (not shown below)
Take a look at the simple materials and tools.
The Steps for How to Make the Easy Paper Crafts: Ombre Squares Heart:
Print the Ombre Squares Heart pattern.
Arrange the paper in the order you want the colors.
Cut all of the squares.
Each square is 1 inch by 1 inch.
Cut the number of squares based on which row the color will be.
See the pattern for the number of squares.
Arrange the paper in the order you want the colors.
Cut all of the squares.
Each square is 1 inch by 1 inch.
Cut the number of squares based on which row the color will be.
See the pattern for the number of squares.
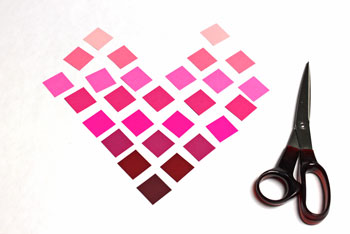
Use the pattern to begin overlapping and gluing each row.
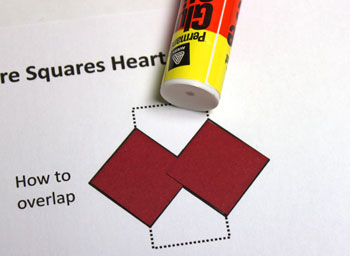
Place glue on the point where the two squares overlap.
Hint: be careful with the glue such that you only glue the squares together and not to the pattern.
Place glue on the point where the two squares overlap.
Hint: be careful with the glue such that you only glue the squares together and not to the pattern.
For the next row of three squares, glue the first two squares together.
Move them to the right on the pattern in order to add, overlap and glue the third square using the pattern's overlap instructions.
Move them to the right on the pattern in order to add, overlap and glue the third square using the pattern's overlap instructions.
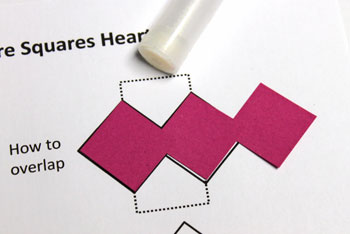
Continue overlapping and gluing the squares until all the rows are complete.
Use the bottom portion of the pattern to begin overlapping the layered rows.
Start with the single square at the bottom.
Add glue to its upper edges and lay the two-square layer on top of the one square.
Match the overlap based on the pattern.
Be careful not to glue the squares to the background pattern.
Start with the single square at the bottom.
Add glue to its upper edges and lay the two-square layer on top of the one square.
Match the overlap based on the pattern.
Be careful not to glue the squares to the background pattern.
Continue overlapping and gluing the layers until the shape is complete.
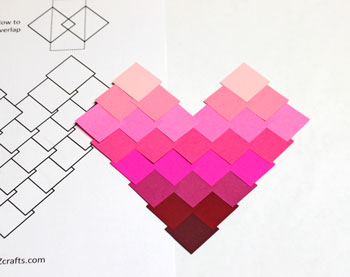
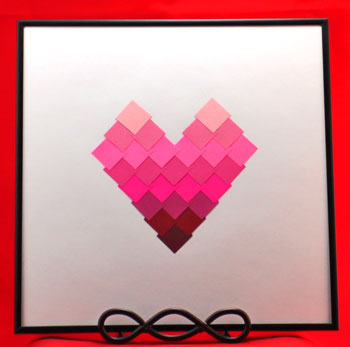
Center the ombre squares heart on the background paper, in this case a white 12x12 card stock.
The vertical center should be six inches from the right and left edges.
The top and bottom should be equidistant from the top and bottom edges.
Glue the heart shape to the background.
The vertical center should be six inches from the right and left edges.
The top and bottom should be equidistant from the top and bottom edges.
Glue the heart shape to the background.

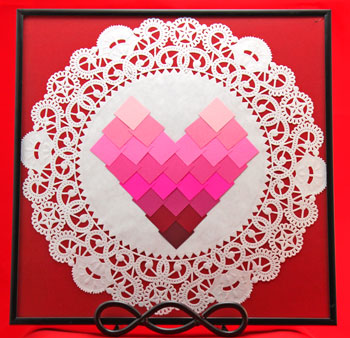
Add a simple frame to display the pretty little heart.
For fun, this example used a 12-inch paper doily behind the heart with a ninth color in red for the background.
Simple squares of paper become an interesting and eye-catching decoration.
Use it for Valentine's Day or any time of the year.
Be creative with the colors you choose and have fun!
The Ombre Squares Heart can be a pretty addition in an office, in a foyer or anywhere for a fun and colorful decoration.
Use it for Valentine's Day or any time of the year.
Be creative with the colors you choose and have fun!
The Ombre Squares Heart can be a pretty addition in an office, in a foyer or anywhere for a fun and colorful decoration.


funEZcrafts
Welcome
Come on in and stay awhile...

funEZcrafts
Welcome
Come on in and stay awhile...