Easy Felt Crafts: Wine Gift Bag
Do you enjoy wine - either drinking or cooking?
Maybe you like to give wine as a gift to family and friends.
Here's an easy felt crafts project that shows how-to make a simple yet pretty wine gift bag.
The bag holds your gift bottle of wine and makes a great addition to the presentation of the wine to your friends or family.
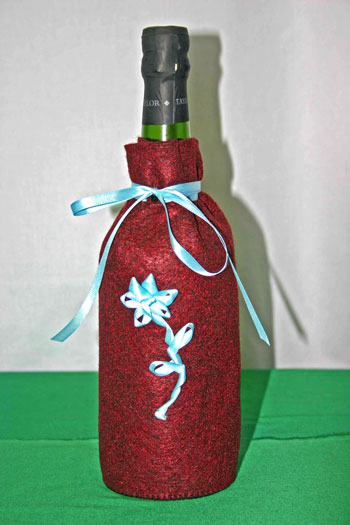
The first wine bag shows the wine gift bag embellished with a blue ribbon.
This ribbon is a soft woven ribbon 1/4 inch wide.
Maybe you like to give wine as a gift to family and friends.
Here's an easy felt crafts project that shows how-to make a simple yet pretty wine gift bag.
The bag holds your gift bottle of wine and makes a great addition to the presentation of the wine to your friends or family.
The first wine bag shows the wine gift bag embellished with a blue ribbon.
This ribbon is a soft woven ribbon 1/4 inch wide.
The second version uses a green ribbon embellishment.
The green ribbon is 1/2 inch wide and much stiffer than the blue.
The green ribbon is 1/2 inch wide and much stiffer than the blue.
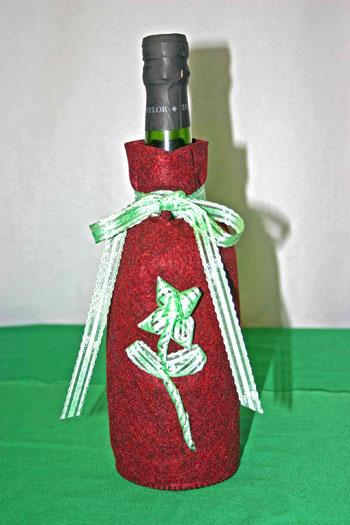
The narrow, softer ribbon makes attaching the flower design easier, plus it's easier to add more flower petals.
However, the stiffer, wider ribbon holds the three dimensional shape better.
However, the stiffer, wider ribbon holds the three dimensional shape better.
Easy Felt Crafts: Wine Gift Bag Materials and Tools:
Craft felt (your favorite color) 2 pieces of 9 in x 12 in
Yarn (size 3 or size 10 crochet yarn both work great)
Yarn darner needle (a pack of size 14 to 18 gives you alternatives)
Ribbon - 2 yards of 1/4 inch to 1/2 inch wide ribbon
Thread to match either the ribbon or the felt
Sewing needle
Straight pins (just a few)
Paper
Chalk pencil (or small piece of bar soap for marking)
Ruler
Compass to draw circle
Scissors
The Steps for How to Make the Easy Felt Crafts: Wine Gift Bag:
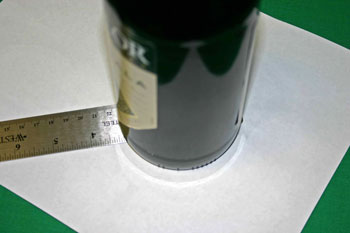
First, determine the diameter of your wine bottle.
Set the wine bottle on a ruler with the widest part over the measurement lines.
Read the measurement.
Set the wine bottle on a ruler with the widest part over the measurement lines.
Read the measurement.
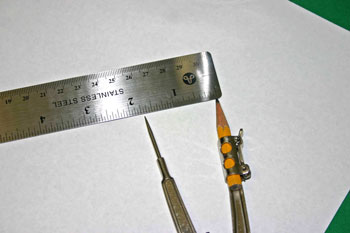
Divide that measure by two and add 1/8 inch for the setting for the compass.
The additional 1/8 inch allows for the stitching around the circle.
Using the ruler set the compass at the calculated distance apart.
The additional 1/8 inch allows for the stitching around the circle.
Using the ruler set the compass at the calculated distance apart.
On a piece of paper, draw the circle. This circle will be the template for the base of the wine gift bag.
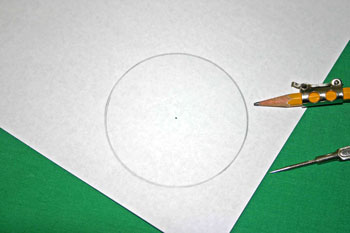
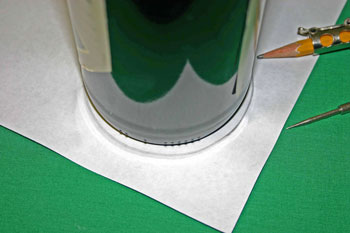
Verify the circle is large enough by setting the wine bottle over the circle on the paper.
The drawn circle should be slightly larger than the bottle.
The drawn circle should be slightly larger than the bottle.
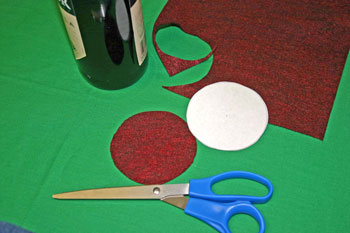
Cut the paper template. Use the template to cut the bag's base circle out of one of the pieces of felt.
For efficiency, cut the circle close to one corner of the felt.
This leaves the largest amount of felt remaining for another project.
Plus, if your wine bottle is greater than 3.5 inches in diameter, the extra felt can be used to extend the upper part of the bag.
For efficiency, cut the circle close to one corner of the felt.
This leaves the largest amount of felt remaining for another project.
Plus, if your wine bottle is greater than 3.5 inches in diameter, the extra felt can be used to extend the upper part of the bag.
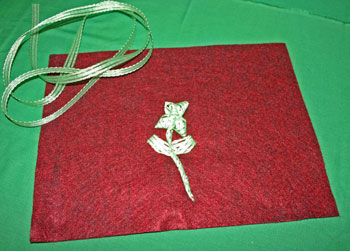
Identify the center of the second piece of felt.
Fold the felt in half lengthwise.
Place a pin on the fold near the middle.
Next, fold the felt in half across its width.
Place a pin on the fold.
Where the two pins cross is the center.
Fold the felt in half lengthwise.
Place a pin on the fold near the middle.
Next, fold the felt in half across its width.
Place a pin on the fold.
Where the two pins cross is the center.
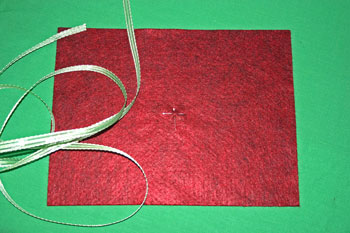
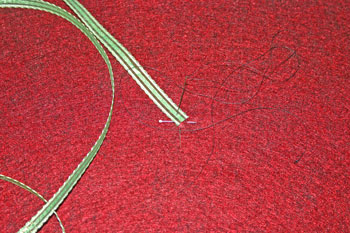
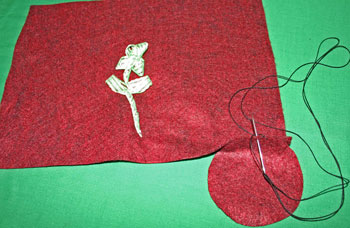
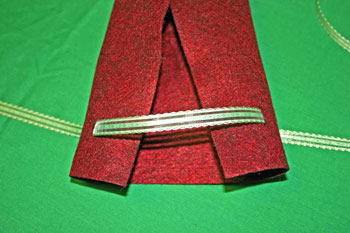
Thread the sewing needle with thread to match either the ribbon or the felt.
Place an end of the ribbon at the center of felt near the crossed pins.
Sew a couple of stitches near the end of the ribbon to anchor it to the felt.
Place an end of the ribbon at the center of felt near the crossed pins.
Sew a couple of stitches near the end of the ribbon to anchor it to the felt.
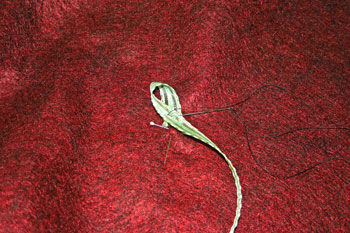
Make the first flower petal by curving the ribbon back onto itself.
Sew a couple of stitches over the previous stitches to hold the lapped ribbon in place.
Sew a couple of stitches over the previous stitches to hold the lapped ribbon in place.
Continue making the other flower petals by curving the ribbon back onto itself and anchoring the ribbon each time with a couple of stitches.
The stitches should all be in the center of the flower.
The stitches should all be in the center of the flower.
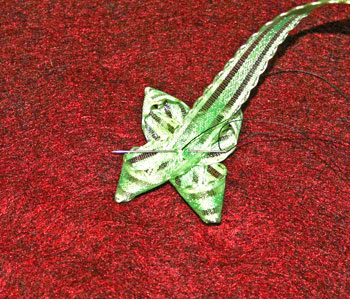
Make a small circle of ribbon in the center of the flower and attach it with a couple of stitches.
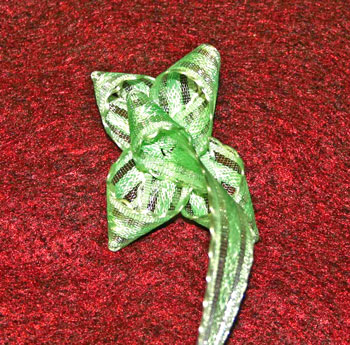
From the center, roll the ribbon to form the stem.
Tack each roll to the felt with a couple of stitches.
Tack each roll to the felt with a couple of stitches.
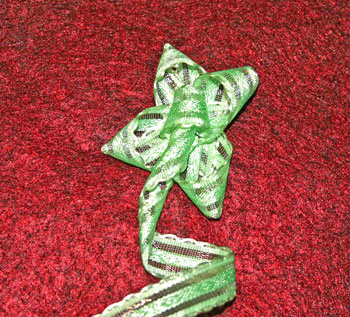
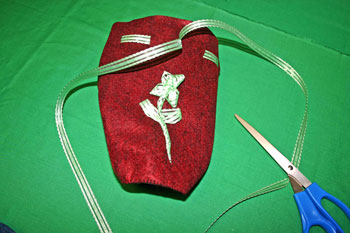
Form the leaves on the stem by first folding the ribbon to one side and tacking with stitches then to the opposite side and tacking with stitches.
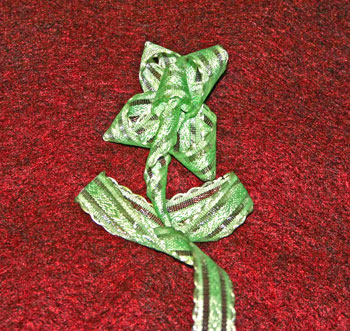
Add a roll or two more of the ribbon to extend the flower stem anchoring each roll to the felt with stitches.
Trim the ribbon.
Use several stitches to hold the end of the ribbon to the felt.
Trim the ribbon.
Use several stitches to hold the end of the ribbon to the felt.
Thread the yarn darner needle with the yarn.
Position the circular base near one edge of the bottom.
(Make sure you sew the circle to the edge at the bottom of the flower not to the top!)
Position the circular base near one edge of the bottom.
(Make sure you sew the circle to the edge at the bottom of the flower not to the top!)
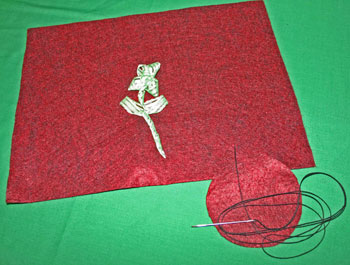
Start sewing the circle to the bottom about one inch from the edge using a blanket stitch. (Pictorial details for how to sew the simple blanket stitch can be found in our free e-book - How to Sew Stitches.)
Continue the blanket stitch around the circle.
For circles less than 3.5 inches, the edges should overlap.
Knot the thread near the felt seam, hide the thread end in the seam and clip the thread.
If you have a larger diameter bottle, add felt from the other piece to cover and overlap the ends.
For circles less than 3.5 inches, the edges should overlap.
Knot the thread near the felt seam, hide the thread end in the seam and clip the thread.
If you have a larger diameter bottle, add felt from the other piece to cover and overlap the ends.
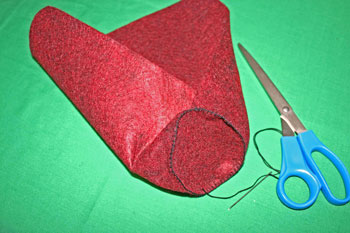
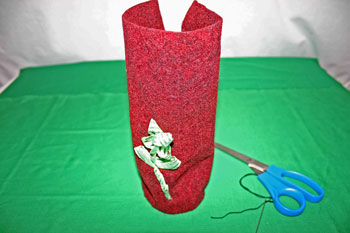
Leave the back of the felt bag open.
The ribbon will secure the back and hold it in place.
The ribbon will secure the back and hold it in place.
Measure and mark the placement of the holes for the ribbon.
On the top edge, measure 1.5 inches from the top, 1.5 inches from the end and make a small mark with a chalk pencil or piece of bar soap.
Measure 1.5 inches from this mark and 1.5 inches from the edge for the next position.
Continue measuring across the felt edge. There should be seven small marks.
On the top edge, measure 1.5 inches from the top, 1.5 inches from the end and make a small mark with a chalk pencil or piece of bar soap.
Measure 1.5 inches from this mark and 1.5 inches from the edge for the next position.
Continue measuring across the felt edge. There should be seven small marks.
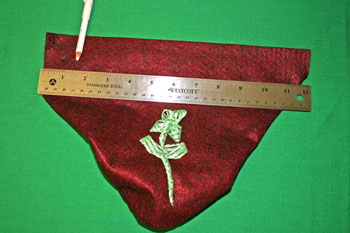
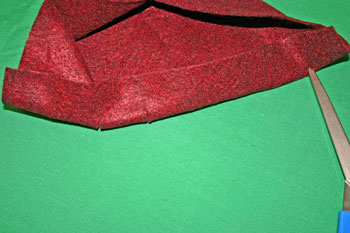
Fold the felt on the line made by the marked positions.
Cut small slits slightly larger than the width of your ribbon.
Cut small slits slightly larger than the width of your ribbon.
Thread the remaining piece of ribbon through the holes.
Starting at the back, thread the ribbon from the outside to the inside of the felt bag.
Starting at the back, thread the ribbon from the outside to the inside of the felt bag.
Alternate threading the holes until both ends of the ribbon come out the front of the felt bag over the flower.
Place the wine gift bottle into the bag and pull the ribbon to gather the felt.
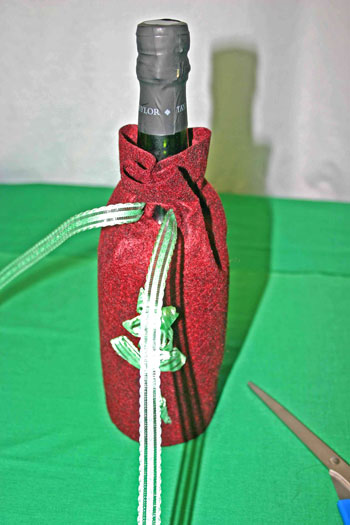
Wrap the ribbon around the back of the neck of the bottle and back to the front.
Tie a simple but pretty bow and trim the ends of the ribbon at an angle.
Tie a simple but pretty bow and trim the ends of the ribbon at an angle.
An easy, inexpensive yet pretty wine gift bag for those gifts this holiday season.
Enjoy!
Enjoy!


funEZcrafts
Welcome
Come on in and stay awhile...

funEZcrafts
Welcome
Come on in and stay awhile...